Showing posts with label Valentines. Show all posts

Friday, February 7, 2014

THICK & THIN WOODEN VALENTINE HEART

I would love to have a renovation update for you, but I don't.  Not because things aren't getting done, because they are, but slowly.  The weather is not my friend.  It's beyond frustrating.  Suzan at Simply Vintageous...by Suzan was giving me a little grief about not making a ton of Valentine crafts like I usually do, so I decided to make something yesterday instead of being all frustrated.  Suzan loves hearts, so ....
A couple of years ago I found some ugly wooden hearts.  Somewhere in my computer there is a picture of them, but I'm too lazy to search for it.  I primed them with white spray primer and then they sat around for a year.  I outlined the heart with black marker.
Some black and white washi tape was the perfect width for covering the edges.

Since I don't have a silhouette and because I wanted to finish this craft in like 20 minutes, I opted for some "rub on" words.  Too easy.
"Thick and Thin"....yep, that pretty much describes our 20 plus years of marriage for sure.
I found a cute little stick on dot just to give it some 3-D-ness.  Gave about 30 seconds thought to adding some more bling and voted no.  
I stuck it up on a little shelf in my black and white bedroom.  Which reminds me...I never posted more about my black and white bedroom.  Oh well.  Now it has a black and white heart that reminds me that Valentines Day is really all about loving someone through thick and thin.  

Wednesday, January 15, 2014

Valentine Love From Someone Else

I'm still busy with renovation happiness.  The new windows are in!  The furnace guys have completed all of the new duct work under the house and in the attic (two places I have no intention of visiting),  my kitchen cabinets are finished and being delivered today.  But....I'm not posting anything about that today.  What I want to tell you is....
Carlene at Organized Clutter has done a fabulous guest post over at the Inspiration Cafe as well as another awesome Valentine project over at her own blog.   I love Valentines crafts...can't help myself.  I intend to try a variation of both of these crafts, but for now...go check them out and see if they inspire you!
Click here to see the finished project!
I cannot wait to try making my own "rust"!  You can do it to with stuff you already have at hand.  Go check it out and just try not to fall in love with the end result....
Click here to see how to make your own rust!
Carlene is always inspiring me in one way or another.  Thank you girl.

I'm turning my comments off for this post...save them for Carlene!
 

Monday, January 13, 2014

PALLET VALENTINE FOLK ART

You know, mostly, I consider myself to be a craft blogger.  But, I realize that it's been a long time since I actually posted a craft on here.  Two months to be exact.  Not that I haven't tried.  Oh yes, I tried.  I had a major lamp makeover craft fail and I promise to share that with you...as soon as I make it right!  Then, we bought a new house requiring major renovations, which means that when I am on the computer, I'm cruising Pinterest and Houzz for ideas instead of posting craft projects.  Then, my well froze and I was stuck in the house with no water.  This kind of forced me to take a good hard look at my surroundings.  Since I couldn't be bothered to decorate for Christmas,  my house has been  seriously lacking decor since last fall.  I thought maybe I should put up some Valentines stuff and make my house look a little cheerier, which I did.  In my box of Valentine decor, I found a small scrap of pallet wood.  Inspiration struck and I decided to make something. 
It looks a little "folk-artsy" to me, so I'm calling it folk art.  It went together pretty quickly.  In fact, it took me longer to get a good picture of it than it did to make it.  Figures.
I took some craft paper and made a template of my hand which I then traced on to some sheet music.  (I know, I could have just traced my hand directly on to the music, but I didn't.)
My hand is not that fat and funky looking, I'm sure of it.  I gave it a makeover with some scissors.  After deciding it was too white for my old pallet scrap, I gave it, and some words I tore out from the title, a quick coat of antique gel.
Also, in my box of Valentine stuff, I found a set of 3 wooden plant stakes all cute and painted (by someone else in a land far, far away).
I didn't really like the middle one with the hearts on it so I broke the stake off and flipped it over and used the plain red side.  I decided it was too plain and used a piece of fabric and a little charm key that I spray painted black, in the center of it.  I put it all together with a glue stick (for the hand,fabric and words) and a glue gun (for the heart and key).  I added some tiny eye screws and a chord to hang it with and called it good.  
 Getting a good picture of it was a different story.  First, it was evening and I lost my good light.  Second, I couldn't find a good background that made it look all cute and folk-artsy.  I finally decided to take it outside where I have all kinds of rusty, crusty farm stuff that makes for great backdrops.  I know my friend Donna at Distressed Donna Down home will appreciate the rustiness of the old blue pick-up bed and the tin from the old shed that I settled on for my finished pictures.  Me?  I'm just happy to have started and finished a craft.  (It's been way too long and I was jonesin a little! LOL!)
Bye-bye for now!


Monday, February 11, 2013

Inspiration Cafe - Mel Gets Her Valentine's On!

Hi All,

Mel from Mellywood's Mansion is over at the Cafe today, sharing a fun Valentine project to give to the little girl in your life. 


Just click the picture of the Cafe below and head on over for a quick, cute and easy project, sure to bring a smile to a special girl.


Inspiration Cafe
 If you would like to guest post at the Inspiration Cafe, we'd love for you to let one of us know, or go HERE to our submissions page.
If you've never written a guest post before, that's OK, we're happy to teach you how with this easy step-by-step tutorial HERE.  It's easier than you might think and a great way to get exposure for you blog!

Saturday, February 9, 2013

PALLET BOARD CANDLESCAPE FOR VALENTINE'S DAY

I am just about done with Valentines....really, I am.  But I wanted something for the center of my table, so I made this little candlescape project  in no time flat.

 You may recognize that candle.  I did it last year.  I love changing the beads out every season.
The beads really sparkle in the candle light and I love the little pearls in the bottom of the glass!
The pallet board was left over from a previous project and I used it after Christmas in this Winter Candle Scape...
I gave it a little makeover by adding a few scatter stones in heart-shapes and I'm enjoying it again for Valentines Day.......
 What's in the center of your table right now?  

Thursday, February 7, 2013

HEY GIRL.......A LITTLE FUN WITH MY GUY!

Yesterday, Suzan at Simply Vintageous by SuzyQ, asked me if I was going to do the Hey Girl link party.  I had no idea what she was talking about.  She clued me in.
So we've all seen the Ryan Gosling "Hey Girl" memes.  They're always so awesome.  A few of my faves.....


 So a few fun bloggers are doing a Hey Girl link party where your husband, instead of Ryan Gosling is the star.  Without further adieu......meet my husband Sam.


 So if you want to join in for the Valentine's "Hey Girl" link party, make your picture and link it up to any one of the blogs listed below.  Don't have a husband?  No problem, you can use your pet, your friend, your favorite star.  This party is open to both bloggers and non-bloggers from February 7th - 13th.  Should be fun!

Link on one, fun on all five. 


Michelle at Decor and the Dog
 Thanks Suzan....hope I don't get in too much trouble!
Love you Sam!  You really are my "Hey Girl" man!

Wednesday, February 6, 2013

RASPBERRY STAINED GLASS VALENTINE DESSERT

This is one of the prettiest desserts I've ever made and it was super easy!

I love the way the heart looks like it's just floating in the center of that creamy white border!  (Which by the way is so delicious because it's made from sweetened condensed milk...yummmm!)

I got this recipe idea from my friend Gail from Purple Hues and Me.  She made these really beautiful Mosaic Dessert Bars last spring.
I made her recipe at Christmas and it was so pretty.  I thought maybe I would try a Valentines Day spin on it.  My original thought was to make lots of little tiny hearts, but, I didn't have a tiny heart cookie cutter, so I just made 4 big ones.
 Don't be alarmed....you invert these on to a plate, so you're looking at what is actually the bottom of the dessert.  When you flip it over, it serves up like this...
Here is the recipe that I adapted from Gails original one.

 RASPBERRY STAINED GLASS VALENTINES DESSERT

2        3oz pkgs. Red jello

2    C boiling water

¼ C cold water
1 envelope knox unflavored gelatin
2/3C  ( ½  can)  sweetened condensed milk
  1. Add 2 cups boiling water to 2 pkgs jello; mix at least 2 min. until completely dissolved. Pour into small shallow food storage container sprayed with cooking spray. Refrigerate 2 hours or until firm.
  2. Sprinkle unflavored gelatin over 1/4 C cold water; let stand 1 min. Stir in 3/4 cups boiling water. Add condensed milk; mix well. Cool slightly.
  3. Cut flavored gelatin into heart shapes with cookie cutter. Place hearts in 8 or 9 inch square pan sprayed with cooking spray. Pour milk mixture over hearts just up to the top edge of them. Refrigerate 2 hours or until firm.
  4. Cut into squares.  Loosen edges with a knife, lift out with a spatula and invert onto plate.
My friend Gail is guest posting over at the Inspiration Cafe today, so you might want to head over and see what she's sharing!
 

Thank you Gail for letting me share my spin on your fabulous recipe! 

Saturday, February 2, 2013

VALENTINE CHERRY FUDGE

When I saw a recipe for two ingredient fudge over at Lady With the Red Rocker, my first thought was "no way".   I have to say that at first, when I looked at the 2 ingredients, I thought that it would just never work, but yet, I had to try it.  Here is the end result......
 Aren't they cute?  Let me just tell you that those are each two little bites of cherry heaven.  She made strawberry and put hers in a pan and turned them out and sliced them.  I made mine in a couple of different forms.  For the ones above, I used some cute little round ice cube trays to make them in "two bite" size.  
 They fit perfectly in the cute Valentine candy boxes that I posted about HERE as well.
I also made them in some small block forms (the molded plastic forms that almond bark comes in, although that is not one of the ingredients in this recipe).  
 These worked quite well and also looked phenomenal
 Very easy to cut them in half to make a two-bite square.
 Finally, I wanted to see if I could make a heart shaped, larger piece by pouring the 2 ingredient mixture into a cookie cutter.
 I put some wax paper underneath it and prayed it wouldn't all just run out from under.  Worked just fine!
I'm not going to give you this recipe....it's not mine to give.  But I will say that it's so easy and so unbelievably delicious, that you should go right over to the  Lady With The Red Rocker blog and get it from her.  Then make a couple of batches of it because you'll want to keep one for yourself!!!
 Thank you to the Lady With The Red Rocker!  You've made many of my friends very happy and they don't even know it yet!
Linking Up:
 
Glitter Glue and Paint

Wednesday, January 30, 2013

BURLAP AND GINGHAM HEART

Although I live on a farm, country is not necessarily my style, but every now and then a little bit of it sneaks into my decor.  Just a little.  Like this.....

I didn't really start out to make a country-style heart, it just kind of ended up that way.
I picked up these wooden hearts last year at a thrift store.  A whole string of them.  They had some kind of saying on them, I forget what, and had some flowers painted on them.  Really, they were hideous.
I thought about painting over them, but it was faster and easier to cover them with some burlap, which I cut out and just glued on, because I'm lazy and have no patience for drying paint.
Using my number stamps, I put a 14 on the center...almost.  I'm not the best at lining this stuff up obviously.
The edges were still pink, which I didn't like.  I covered them with some kind of lace trim that I found in my box of ribbons.
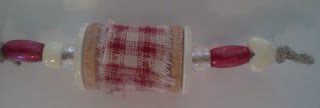
I also added some eye hooks....one on the top for hanging and one on the bottom because in my infinite wisdom I thought that it needed something dangling down from it.  I used an old wooden thread spool, wrapped some gingham fabric around it and strung a few beads on each end.
Here is where I always run into trouble with that whole "less is more" thing.  I messed with those beads forever trying to figure out what looked best.  Then I felt like the burlap heart was way too plain.  I asked my highly valued, totally underpaid decorating consultant (aka my husband Sam) for his opinion.  He said, "needs something around the heart".  I asked him if he could expound on that professionally technical opinion and he said it needed just a border outline around it. I cut a heart out of the same fabric I used on the thread and glued it on.
  He's a genius!
 If you would like to use my husband's consulting services, just send me an email.  I think he'll work for food.....something he doesn't have to cook himself while I'm busy crafting....although I will say he's become a very good cook over the last year!!

Linking up to any or all of the fine parties listed at the bottom of this page, as well as:

Visit thecsiproject.com

Saturday, January 26, 2013

Valentine Mini Shadow Box

When my good friend Judy came to visit last fall, she brought me the cutest little shadow box and I do mean little!  It measures a mere 2 1/2" X 2 1/2"Although I looked at it many times during Christmas, I never quite figured out what to display in it.  But I knew just what to do with it last week!
 Isn't it the cutest little shadow box?  All it took to inspire me was a 30% off sale and a gift card to Hobby Lobby where I found the sweetest little heart shaped buttons.
 I opened the shadow box and put the buttons in...........
Nice, but needs a little something to set it off a little don't ya think?
I trimmed down some washi tape to fit and stuck it right on the frame.
Now you know my favorite thing about this project is that after Valentine's Day is over, the tape peels right off, the buttons come out and it's ready for a new makeover  For now though, I'm enjoying it just the way it is!
 Thank you Judy.....I love this little shadow box!
 
Linking up to any or all of the fine parties listed at the bottom of this page, as well as: